It us beautiful pattern. I’d love to mKe it, but I am not surd what the sy bols mean. Thd horizontal and vertiv a ls Re obviously knit and purls – which are wnich. . . And what are the “V”s? Thanks
Hey guys ! I like that scarf pattern so much that I showed it to my boyfriend and BAM ! “I want you to knit me that scarf, pleeeease “. Ok, no problemo, except that I didn’t have the slightest idea about how to do it (I Don’t read Japanese sadly). So I spent a few hours trying to knit what’s on the charts, trying to understand how this all works.
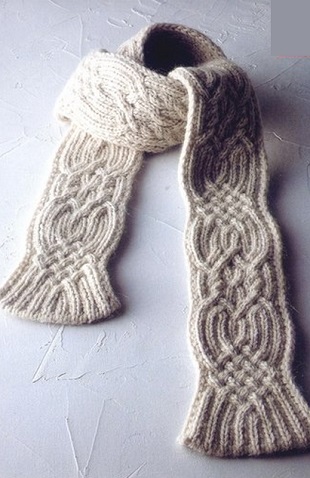
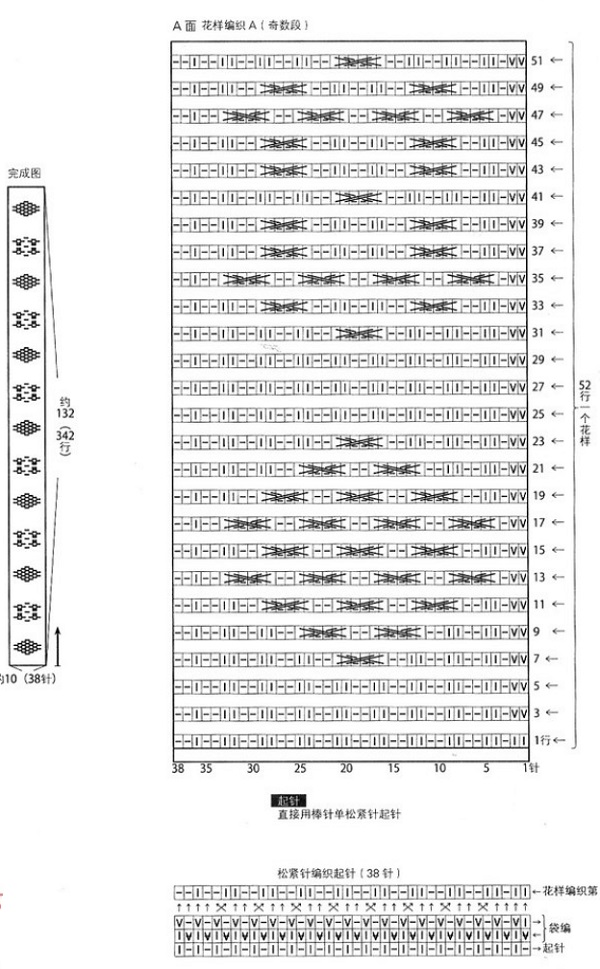
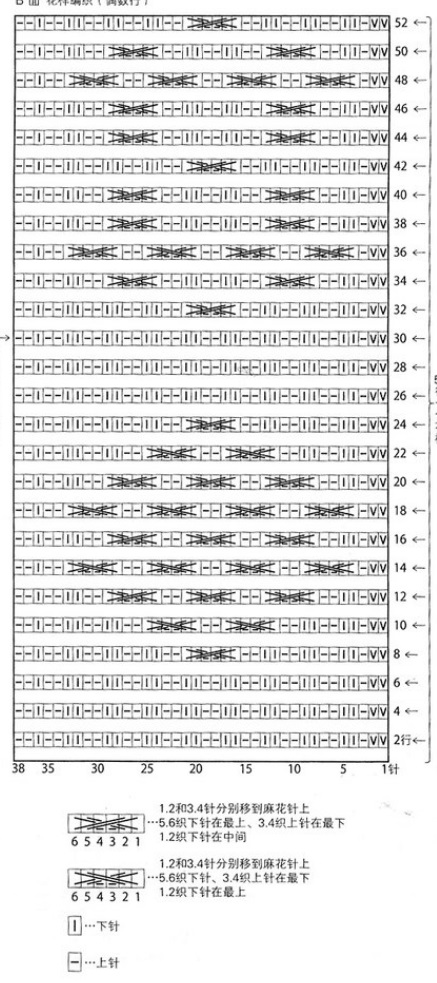
Let’s beging by understanding that pattern, it really helps knitting it. The pattern starts by knitting 2/2 rib stitch. As you know, rib stitch will kind of contract itself and you will only see the knit stitches on each side : that gives you virtually to sides of stockinette stich like the two sides of a slate. So if you knit a cable between 2 ribs of knit stitches and leave the rib of purl stitches between them at the exact same place (in the middle, and in the background – very important), your cable will appear only on one side and the other side will stay classic 2/2 rib stitch. That’s very clever and gives you the opportunity to knit a reversible scarf, because each row is reapeated on each side (hence the two charts : one for even rows and one for uneven rows which are exactly identical).
I suggest knitting a sample and a few cables (both left and right since they are knitted in a different way) and on both sides.
V : as explained above, you slip purlwise the first 2 stitches of each row, they will be purled on the next row, and give you a nice stockinette border that kind of make a thick border which is very pretty in the reversible scarf. I dont’t know if I got that ok, but I slip 2 stitches purlwise, with yarn in the back, then bring yarn in front and purl the 3rd stitch.
I : knit (on each side : for each side is the right side since this is a reversible scarf)
– : purl
Cable towards the right (1st one in the description of stitches under the last chart) : Slip 1 and 2 on your right needle Slip 3 and 4 on a cable needle in the back Slip 1 and 2 on you left needle Slip 1 and 2 on the cable needle (it is now situated on the left of the purl 3 and 4 stitches like this : 2 1 4 3) Cable neeble stays in the back Knit 5 and 6 and slip the four other stitches back on your left needle to knit them as they come (purl 3 and 4 / knit 1 and two) So know you have a right heading cable on the side you are knitting, and still regular 2/2 rib stitch on the other side. Your stitches in the cable are now : 2 1 4 3 6 5 with 4 3 being in the background and 6 5 being in the foreground.
Cable towards the left (2nd one in the description of stitches under the last chart) : Slip 1 2 3 4 on your right needle Slip 5 and 6 on a cable needle in the front Slip 3 and 4 on you left needle Slip 3 and 4 on the cable needle (it is now situated on the left of 5 and 6 like this : 4 3 6 5) Put cable neeble in the back Slip 1 and 2 on left needle, then slip the four stitches from the cable needle on left needle and knit stitches as they come (K 2, P 2, K 2) So know you have a left heading cable on the side you are knitting, and still regular 2/2 rib stitch on the other side. Your stitches in the cable are now : 2 1 4 3 6 5 with 4 3 being in the background and 2 1 being in the foreground.
All you have to do is keep repeating the pattern until your scarf is the length you desired. I used Mongolia 5 yarn from Fonty with 6 mm needles (as indicated for this yarn) and it’s absolutely beautiful so far. The scarf is 12 cm large wich is rather good in my opinion, it shouldn’t be two wide cause the cables make it quite sitff. I was able to knit 2 repeats of the pattern in 4 days of holiday (but not knitting all day long) so this is way faster than I expected.
Sorry for all the faults, I’m french and I’m trying my best. Don’t hesitate if you have any question.
Hey guys ! I like that scarf pattern so much that I showed it to my boyfriend and BAM ! “I want you to knit me that scarf, pleeeease “. Ok, no problemo, except that I didn’t have the slightest idea about how to do it (I Don’t read Japanese sadly). So I spent a few hours trying to knit what’s on the charts, trying to understand how this all works.
Let’s beging by understanding that pattern, it really helps knitting it. The pattern starts by knitting 2/2 rib stitch. As you know, rib stitch will kind of contract itself and you will only see the knit stitches on each side : that gives you virtually to sides of stockinette stich like the two sides of a slate. So if you knit a cable between 2 ribs of knit stitches and leave the rib of purl stitches between them at the exact same place (in the middle, and in the background – very important), your cable will appear only on one side and the other side will stay classic 2/2 rib stitch. That’s very clever and gives you the opportunity to knit a reversible scarf, because each row is reapeated on each side (hence the two charts : one for even rows and one for uneven rows which are exactly identical).
I suggest knitting a sample and a few cables (both left and right since they are knitted in a different way) and on both sides.
V : as explained above, you slip purlwise the first 2 stitches of each row, they will be purled on the next row, and give you a nice stockinette border that kind of make a thick border which is very pretty in the reversible scarf. I dont’t know if I got that ok, but I slip 2 stitches purlwise, with yarn in the back, then bring yarn in front and purl the 3rd stitch.
I : knit (on each side : for each side is the right side since this is a reversible scarf)
– : purl
Cable towards the right (1st one in the description of stitches under the last chart) : Slip 1 and 2 on your right needle Slip 3 and 4 on a cable needle in the back Slip 1 and 2 on you left needle Slip 1 and 2 on the cable needle (it is now situated on the left of the purl 3 and 4 stitches like this : 2 1 4 3) Cable neeble stays in the back Knit 5 and 6 and slip the four other stitches back on your left needle to knit them as they come (purl 3 and 4 / knit 1 and two) So know you have a right heading cable on the side you are knitting, and still regular 2/2 rib stitch on the other side. Your stitches in the cable are now : 2 1 4 3 6 5 with 4 3 being in the background and 6 5 being in the foreground.
Cable towards the left (2nd one in the description of stitches under the last chart) : Slip 1 2 3 4 on your right needle Slip 5 and 6 on a cable needle in the front Slip 3 and 4 on you left needle Slip 3 and 4 on the cable needle (it is now situated on the left of 5 and 6 like this : 4 3 6 5) Put cable neeble in the back Slip 1 and 2 on left needle, then slip the four stitches from the cable needle on left needle and knit stitches as they come (K 2, P 2, K 2) So know you have a left heading cable on the side you are knitting, and still regular 2/2 rib stitch on the other side. Your stitches in the cable are now : 2 1 4 3 6 5 with 4 3 being in the background and 2 1 being in the foreground.
All you have to do is keep repeating the pattern until your scarf is the length you desired. I used Mongolia 5 yarn from Fonty with 6 mm needles (as indicated for this yarn) and it’s absolutely beautiful so far. The scarf is 12 cm large wich is rather good in my opinion, it shouldn’t be two wide cause the cables make it quite sitff. I was able to knit 2 repeats of the pattern in 4 days of holiday (but not knitting all day long) so this is way faster than I expected.
Sorry for all the faults, I’m french and I’m trying my best. Don’t hesitate if you have any question.
What is the key for the scarf pattern, and what yarn weight and needle size was used to make it? I’m rather new to knitting, so I know this scarf might be a challenge for me, but I absolutely love the look of it so I’m willing to try it. Thanks!
For those who wonder, I have recently discovered the 2×2 tubular cast on et now I get it. It is the cast on that is used for that scarf and it would look ten times better than a regular cast on for this parttern. It is what is basically explained in the middle diagram…but I couldn’t figure it out when I first knitted it (for a reminder I do not read japanese…) To keep it simple : you do a 1×1 tubular cast on as explained (for example) by Brooklyn Tweed (here https://brooklyntweed.com/pages/casting-on). When you have knitted about 4 rows in 1×1 tubular cast on, then you do a row that is not knitted, just a row of reorganisation of your stitches according to the second row (from the top) of the middle diagram (you swap a knit and a purl st, then slip a knit and a purl stitch purlwise) according the the diagram …and TADAAA you have your 2×2 rib stitch with the most beautiful cast on ever. I suppose that when you’ve finished knitting your scarf you may do a tubular bind off (which I have never tried but there are lots of video on the internet).
As for wich yarn, I would say a worsted yarn is the most appropriate because it will make a scarf that fit exactly your neck in width (with 5 or 6 mm needles depending on your swatch).
I was able to write out the pattern! I triple-checked it, so I’m fairly certain it’s accurate. I haven’t written out how to finish the other end. If someone has a recommendation, please post it. Enjoy! 🙂
Woah I’m impressed someone took the time to write it all down, that’s amazing Michelle M. ! 2×2 tubular cast on is definitely the thing to do, hence 2×2 tubular bind off seems rather a good idea to give a nice finish to this scarf (YouTube is your friend here). I would recommend to people trying to knit this pattern to read all the messages, because I think all the answers have been given as to how to knit this scarf. Enjoy it, it is much fun to knit!
Is it possible to get a text version of this pattern?
Hi Anna,
I put up everything I have about the pattern so for this one it’s just the diagrams.
Thanks a lot! I love the pattern.
It us beautiful pattern. I’d love to mKe it, but I am not surd what the sy bols mean. Thd horizontal and vertiv a ls Re obviously knit and purls – which are wnich. . . And what are the “V”s?
Thanks
At the beginning of the row it means “slip 1 purlwise”
A real shame there are no written instructions. This is lovely and I’d make it, but charts and I do not get along.
Hey guys ! I like that scarf pattern so much that I showed it to my boyfriend and BAM ! “I want you to knit me that scarf, pleeeease “. Ok, no problemo, except that I didn’t have the slightest idea about how to do it (I Don’t read Japanese sadly). So I spent a few hours trying to knit what’s on the charts, trying to understand how this all works.
Let’s beging by understanding that pattern, it really helps knitting it. The pattern starts by knitting 2/2 rib stitch. As you know, rib stitch will kind of contract itself and you will only see the knit stitches on each side : that gives you virtually to sides of stockinette stich like the two sides of a slate. So if you knit a cable between 2 ribs of knit stitches and leave the rib of purl stitches between them at the exact same place (in the middle, and in the background – very important), your cable will appear only on one side and the other side will stay classic 2/2 rib stitch. That’s very clever and gives you the opportunity to knit a reversible scarf, because each row is reapeated on each side (hence the two charts : one for even rows and one for uneven rows which are exactly identical).
I suggest knitting a sample and a few cables (both left and right since they are knitted in a different way) and on both sides.
V : as explained above, you slip purlwise the first 2 stitches of each row, they will be purled on the next row, and give you a nice stockinette border that kind of make a thick border which is very pretty in the reversible scarf. I dont’t know if I got that ok, but I slip 2 stitches purlwise, with yarn in the back, then bring yarn in front and purl the 3rd stitch.
I : knit (on each side : for each side is the right side since this is a reversible scarf)
– : purl
Cable towards the right (1st one in the description of stitches under the last chart) :
Slip 1 and 2 on your right needle
Slip 3 and 4 on a cable needle in the back
Slip 1 and 2 on you left needle
Slip 1 and 2 on the cable needle (it is now situated on the left of the purl 3 and 4 stitches like this : 2 1 4 3)
Cable neeble stays in the back
Knit 5 and 6 and slip the four other stitches back on your left needle to knit them as they come (purl 3 and 4 / knit 1 and two)
So know you have a right heading cable on the side you are knitting, and still regular 2/2 rib stitch on the other side. Your stitches in the cable are now : 2 1 4 3 6 5 with 4 3 being in the background and 6 5 being in the foreground.
Cable towards the left (2nd one in the description of stitches under the last chart) :
Slip 1 2 3 4 on your right needle
Slip 5 and 6 on a cable needle in the front
Slip 3 and 4 on you left needle
Slip 3 and 4 on the cable needle (it is now situated on the left of 5 and 6 like this : 4 3 6 5)
Put cable neeble in the back
Slip 1 and 2 on left needle, then slip the four stitches from the cable needle on left needle and knit stitches as they come (K 2, P 2, K 2)
So know you have a left heading cable on the side you are knitting, and still regular 2/2 rib stitch on the other side. Your stitches in the cable are now : 2 1 4 3 6 5 with 4 3 being in the background and 2 1 being in the foreground.
All you have to do is keep repeating the pattern until your scarf is the length you desired.
I used Mongolia 5 yarn from Fonty with 6 mm needles (as indicated for this yarn) and it’s absolutely beautiful so far. The scarf is 12 cm large wich is rather good in my opinion, it shouldn’t be two wide cause the cables make it quite sitff. I was able to knit 2 repeats of the pattern in 4 days of holiday (but not knitting all day long) so this is way faster than I expected.
Sorry for all the faults, I’m french and I’m trying my best. Don’t hesitate if you have any question.
I found a Japanese chart on line with illustrations.
I hope this helps. Wish there was a translation for this pattern
http://www.knitting-bee.com/knitting-tutorials/chart-knitting-symbols/japanese-knitting-symbols-illustrated
Hey guys ! I like that scarf pattern so much that I showed it to my boyfriend and BAM ! “I want you to knit me that scarf, pleeeease “. Ok, no problemo, except that I didn’t have the slightest idea about how to do it (I Don’t read Japanese sadly). So I spent a few hours trying to knit what’s on the charts, trying to understand how this all works.
Let’s beging by understanding that pattern, it really helps knitting it. The pattern starts by knitting 2/2 rib stitch. As you know, rib stitch will kind of contract itself and you will only see the knit stitches on each side : that gives you virtually to sides of stockinette stich like the two sides of a slate. So if you knit a cable between 2 ribs of knit stitches and leave the rib of purl stitches between them at the exact same place (in the middle, and in the background – very important), your cable will appear only on one side and the other side will stay classic 2/2 rib stitch. That’s very clever and gives you the opportunity to knit a reversible scarf, because each row is reapeated on each side (hence the two charts : one for even rows and one for uneven rows which are exactly identical).
I suggest knitting a sample and a few cables (both left and right since they are knitted in a different way) and on both sides.
V : as explained above, you slip purlwise the first 2 stitches of each row, they will be purled on the next row, and give you a nice stockinette border that kind of make a thick border which is very pretty in the reversible scarf. I dont’t know if I got that ok, but I slip 2 stitches purlwise, with yarn in the back, then bring yarn in front and purl the 3rd stitch.
I : knit (on each side : for each side is the right side since this is a reversible scarf)
– : purl
Cable towards the right (1st one in the description of stitches under the last chart) :
Slip 1 and 2 on your right needle
Slip 3 and 4 on a cable needle in the back
Slip 1 and 2 on you left needle
Slip 1 and 2 on the cable needle (it is now situated on the left of the purl 3 and 4 stitches like this : 2 1 4 3)
Cable neeble stays in the back
Knit 5 and 6 and slip the four other stitches back on your left needle to knit them as they come (purl 3 and 4 / knit 1 and two)
So know you have a right heading cable on the side you are knitting, and still regular 2/2 rib stitch on the other side. Your stitches in the cable are now : 2 1 4 3 6 5 with 4 3 being in the background and 6 5 being in the foreground.
Cable towards the left (2nd one in the description of stitches under the last chart) :
Slip 1 2 3 4 on your right needle
Slip 5 and 6 on a cable needle in the front
Slip 3 and 4 on you left needle
Slip 3 and 4 on the cable needle (it is now situated on the left of 5 and 6 like this : 4 3 6 5)
Put cable neeble in the back
Slip 1 and 2 on left needle, then slip the four stitches from the cable needle on left needle and knit stitches as they come (K 2, P 2, K 2)
So know you have a left heading cable on the side you are knitting, and still regular 2/2 rib stitch on the other side. Your stitches in the cable are now : 2 1 4 3 6 5 with 4 3 being in the background and 2 1 being in the foreground.
All you have to do is keep repeating the pattern until your scarf is the length you desired.
I used Mongolia 5 yarn from Fonty with 6 mm needles (as indicated for this yarn) and it’s absolutely beautiful so far. The scarf is 12 cm large wich is rather good in my opinion, it shouldn’t be two wide cause the cables make it quite sitff. I was able to knit 2 repeats of the pattern in 4 days of holiday (but not knitting all day long) so this is way faster than I expected.
Sorry for all the faults, I’m french and I’m trying my best. Don’t hesitate if you have any question.
Beautiful pattern.Written instructions would help vastly. Please can you help? Radha
What is the key for the scarf pattern, and what yarn weight and needle size was used to make it? I’m rather new to knitting, so I know this scarf might be a challenge for me, but I absolutely love the look of it so I’m willing to try it. Thanks!
Really no matter if someone doesn’t understand after that its up to other visitors that they will assist, so here
it happens.
For those who wonder, I have recently discovered the 2×2 tubular cast on et now I get it. It is the cast on that is used for that scarf and it would look ten times better than a regular cast on for this parttern. It is what is basically explained in the middle diagram…but I couldn’t figure it out when I first knitted it (for a reminder I do not read japanese…)
To keep it simple : you do a 1×1 tubular cast on as explained (for example) by Brooklyn Tweed (here https://brooklyntweed.com/pages/casting-on). When you have knitted about 4 rows in 1×1 tubular cast on, then you do a row that is not knitted, just a row of reorganisation of your stitches according to the second row (from the top) of the middle diagram (you swap a knit and a purl st, then slip a knit and a purl stitch purlwise) according the the diagram …and TADAAA you have your 2×2 rib stitch with the most beautiful cast on ever. I suppose that when you’ve finished knitting your scarf you may do a tubular bind off (which I have never tried but there are lots of video on the internet).
As for wich yarn, I would say a worsted yarn is the most appropriate because it will make a scarf that fit exactly your neck in width (with 5 or 6 mm needles depending on your swatch).
А сколько этой пряжи надо? Пряжа Pole Fonty
I was able to write out the pattern! I triple-checked it, so I’m fairly certain it’s accurate. I haven’t written out how to finish the other end. If someone has a recommendation, please post it. Enjoy! 🙂
Cast on 38 sts, with tubular cast on:
WS 1: *k1, p1* 19x
RS 2: *sl1pw, k1* 19x
WS 3: *k1, sl1pw* 19x
Re-org: sl 4, *swap 2, sl 2* 8x, sl 2
RS 4: k2, p1, *k2, p2* 8x, k1, p2
Chart A (odd rows) & Chart B (even rows)
Row 1: k2, p1, *k2, p2* 9x
Row 2: sl2pw, p1, *k2, p2* 8x, k1, p2
Row 3: sl2pw, p1, *k2, p2* 9x
Row 4: sl2pw, p1, *k2, p2* 8x, k1, p2
Row 5: sl2pw, p1, *k2, p2* 9x,
Row 6: sl2pw, p1, *k2, p2* 8x, k1, p2
Row 7: sl2pw, p1, *k2, p2* 3x, RC6, *p2, k2* 3x, p2, k1, p2
Row 9: sl2pw, p1, *k2, p2* 2x, LC6, p2, LC6, *p2, k2* 2x, p2, k1, p2
Row 8: sl2pw, p1, *k2, p2* 3x, RC6, *p2, k2*3x, p2, k1, p2
Row 10: sl2pw, p1, *k2, p2* 2x, *LC6, p2* 2x, *k2, p2* 2x, k1, p2
Row 11: sl2pw, p1, k2, *p2, RC6* 3x, p2, k2, p2, k1, p2
Row 12: sl2pw, p1, k2, p2, *RC6 p2* 3x, k2, p2, k1, p2
Row 13: sl2pw, p1, *LC6, p2* 4x, k1, p2
Row 14: sl2pw, p1, *LC6, p2* 4x, p2, k1, p2
Row 15: sl2pw, p1, k2, *p2, RC6* 3x, p2, k2, p2, k1, p2
Row 16: sl2pw, p1, k2, p2, *RC6, p2* 3x, k2, p2, k1, p2
Row 17: sl2pw, p1, *LC6, p2* 4x, k1, p2
Row 18: sl2pw, p1, *LC6, p2* 4x, k1, p2
Row 19: sl2pw, p1, k2, p2, *RC6, p2* 3x, k2, p2, k1, p2
Row 20: sl2pw, p1, k2, p2, *RC6, p2* 3x, k2, p2, k1, p2
Row 21: sl2pw, p1, *k2, p2* 2x, *LC6, p2* 2x, *k2, p2* 2x, k1, p2
Row 22: sl2pw, p1, *k2, p2* 2x, *LC6, p2* 2x, *k2, p2* 2x, k1, p2
Row 23: sl2pw, p1, *k2, p2* 3x, RC6, *p2, k2* 3x, p2, k1, p2
Row 24: sl2pw, p1, *k2, p2* 3x, RC6, *p2, k2* 3x, p2, k1, p2
Row 25: sl2pw, p1, *k2, p2* 9x
Row 26: sl2pw, p1, *k2, p2* 9x
Row 27: sl2pw, p1, *k2, p2* 9x
Row 28: sl2pw, p1, *k2, p2* 9x
Row 29: sl2pw, p1, *k2, p2* 9x
Row 30: sl2pw, p1, *k2, p2* 9x
Row 31: sl2pw, p1, *k2, p2* 3x, RC6, *p2, k2* 3x, p2, k1, p2
Row 32: sl2pw, p1, *k2, p2* 3x, RC6, *p2, k2* 3x, p2, k1, p2
Row 33: sl2pw, p1, k2, p2, RC6, *p2, k2* 2x, p2, RC6, p2, k2, p2, k1, p2
Row 34: sl2pw, p1, k2, p2, RC6, *p2, k2* 2x, p2, RC6, p2, k2, p2, k1, p2
Row 35: sl2pw, p1, *LC6, p2, RC6, p2*, k1, p2
Row 36: sl2pw, p1, *LC6, p2, RC6, p2* 2x, k1, p2
Row 37: sl2pw, p1, k2, p2, RC6, *p2, k2* 2x, p2, RC6, p2, k2, p2, k1, p2
Row 38: sl2pw, p1, k2, p2, RC6, *p2, k2* 2x, p2, RC6, p2, k2, p2, k1, p2
Row 39: sl2pw, p1, k2, p2, RC6, *p2, k2* 2x, p2, RC6, p2, k2, p2, k1, p2
Row 40: sl2pw, p1, k2, p2, RC6, *p2, k2* 2x, p2, RC6, p2, k2, p2, k1, p2
Row 41: sl2pw, p1, *k2, p2* 3x, RC6, *p2, k2* 3x, p2, k1, p2
Row 42: sl2pw, p1, *k2, p2* 3x, RC6, *p2, k2* 3x, p2, k1, p2
Row 43: sl2pw, p1, k2, p2, RC6, *p2, k2* 2x, p2, RC6, p2, k2, p2, k1, p2
Row 44: sl2pw, p1, k2, p2, RC6, *p2, k2* 2x, p2, RC6, p2, k2, p2, k1, p2
Row 45: sl2pw, p1, k2, p2, RC6, *p2, k2* 2x, p2, RC6, p2, k2, p2, k1, p2
Row 46: sl2pw, p1, k2, p2, RC6, *p2, k2* 2x, p2, RC6, p2, k2, p2, k1, p2
Row 47: sl2pw, p1, *RC6, p2, LC6, p2*, p2, k1, p2
Row 48: sl2pw, p1, *RC6, p2, LC6, p2* 2x, k1, p2
Row 49: sl2pw, p1, k2, p2, RC6, *p2, k2* 2x, p2, RC6, p2, k2, p2, k1, p2
Row 50: sl2pw, p1, k2, p2, RC6, *p2, k2* 2x, p2, RC6, p2, k2, p2, k1, p2
Row 51: sl2pw, p1, *k2, p2* 3x, RC6, *p2, k2* 3x, p2, k1, p2
Row 52: sl2pw, p1, *k2, p2* 3x, RC6, *p2, k2* 3x, p2, k1, p2
Repeat rows 1-52 to the desired length, then repeat diamond cable pattern (rows 7-24).
CABLES
Right Cable 6
LN to RN: sl 2 sts 1-2
LN to CN: sl 2, back sts 3-4
RN to LN: sl 2 sts 1-2
LN to CN: sl 2 sts 1-2 CN order: 2 1 4 3 – keep in back
LN: k2 sts 5-6
CN to LN: sl 4 sts 1-4
LN: p2, k2 sts 3-4, sts 1-2 CN order: 2 1 4 3 6 5 4 & 3 in background; 6 & 5 in foreground
Left Cable 6
LN to RN: sl 4 sts 1-4
LN to CN: sl 2, front sts 5-6
RN to LN: sl 2 sts 3-4
LN to CN: sl 2 sts 3-4 CN order: 4 3 6 5 – cable needle to back
CN to LN: sl 2 sts 1-2
CN to LN: sl 4 sts 3-6
LN: k2, p2, k2 sts 1-6 CN order: 2 1 4 3 6 5 4 & 3 in background; 2 & 1 in foreground
Thank you so much for your hard work. This is great!!!!
Thank you so much.!!!!
Woah I’m impressed someone took the time to write it all down, that’s amazing Michelle M. ! 2×2 tubular cast on is definitely the thing to do, hence 2×2 tubular bind off seems rather a good idea to give a nice finish to this scarf (YouTube is your friend here).
I would recommend to people trying to knit this pattern to read all the messages, because I think all the answers have been given as to how to knit this scarf. Enjoy it, it is much fun to knit!
А сколько этой пряжи надо? Пряжа Pole Fonty